VST Amp Rack
VST Amp Rack is a powerful guitar amp simulator. It offers a choice of amplifiers and speaker cabinets that can be combined with stomp box effects.
Cubase LE |
Cubase AI |
Cubase Elements |
Cubase Artist |
Cubase Pro |
Nuendo |
NEK |
|
|---|---|---|---|---|---|---|---|
Included with |
– |
– |
X |
X |
X |
X |
– |

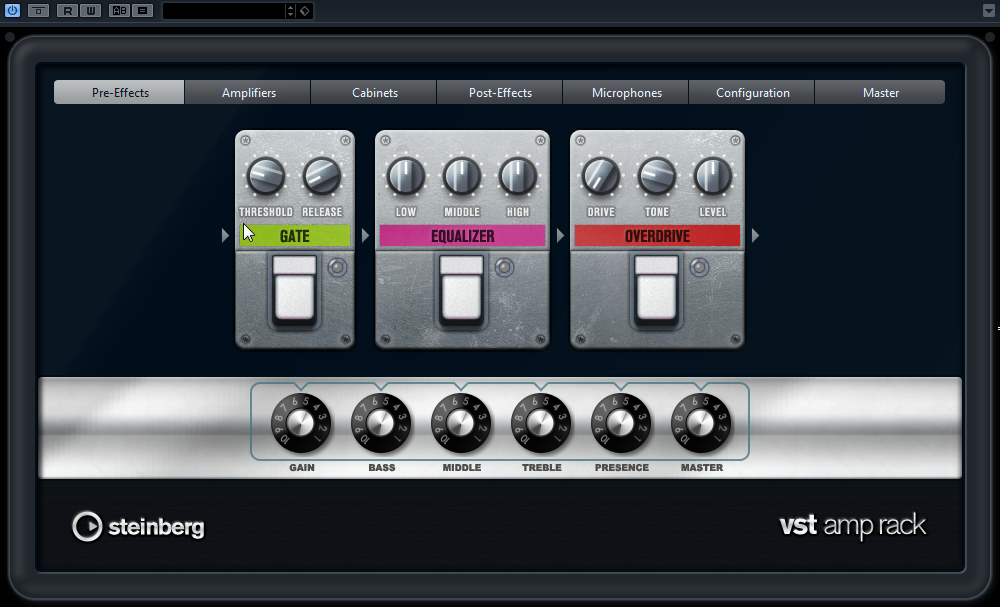
At the top of the plug-in panel, there are six buttons, arranged according to the position of the corresponding elements in the signal chain. These buttons open different pages in the display section of the plug-in panel: Pre-Effects, Amplifiers, Cabinets, Post-Effects, Microphone Position, Master, and Configuration.
Below the display section, the selected amplifier is shown. The color and texture of the area below the amplifier indicate the selected cabinet.
Pre/Post-Effects
On the Pre-Effects and Post-Effects pages, you can select up to six common guitar effects. On both pages, the same effects are available, the only difference being the position in the signal chain (before and after the amplifier). On each page, every effect can be used once.
Each effect features an On/Off button known from stompbox effects, as well as individual parameters.
- Wah Wah
Pedal – Controls the filter frequency sweep.
- Volume
Pedal – Controls the level of the signal passing through the effect.
- Compressor
Intensity – Sets the amount by which an input signal is being compressed.
- Limiter
Threshold – Determines the maximum output level. Signal levels above the set threshold are cut off.
Release – Sets the time after which the gain returns to the original level.
- Maximizer
Amount – Determines the loudness of the signal.
- Chorus
Rate – Allows you to set the sweep rate. This parameter can be synchronized to the project tempo.
- Phaser
Rate – Allows you to set the sweep rate. This parameter can be synchronized to the project tempo.
- Flanger
Rate – Allows you to set the sweep rate. This parameter can be synchronized to the project tempo.
- Tremolo
Rate – Allows you to set the modulation speed. This parameter can be synchronized to the project tempo.
- Octaver
Direct – Adjusts the mix of the original signal and the generated voices. A value of 0 means only the generated and transposed signal is heard. By raising this value, more of the original signal is heard.
- Delay
Delay – Sets the delay time in milliseconds. This parameter can be synchronized to the project tempo.
- Tape Delay
Delay – Tape Delay creates a delay effect known from tape machines. The Delay parameter sets the delay time in milliseconds. This parameter can be synchronized to the project tempo.
- Tape Ducking Delay
Delay – Tape Ducking Delay creates a delay effect known from tape machines with a ducking parameter. The Delay parameter sets the delay time in milliseconds. This parameter can be synchronized to the project tempo.
- Overdrive
Drive – Overdrive creates a tube-like overdrive effect. The higher this value, the more harmonics are added to the output signal of this effect.
- Fuzz
Boost – Fuzz creates a rather harsh distortion effect. The higher this value, the more distortion is created.
- Gate
Threshold – Determines the level at which the gate is activated. Signal levels above the set threshold trigger the gate to open, and signal levels below the set threshold close the gate.
- Equalizer
Low – Changes the level of the low-frequency portion of the incoming signal.
- Reverb
Type – A convolution-based reverb effect. This parameter allows you to switch between different reverb types (Studio, Hall, Plate, and Room).
Sync Mode
Some parameters can be synchronized to the tempo of the host application.
The names of these parameters are underlined. Click a knob to activate or deactivate tempo sync. An LED at the top right of the knob indicates that sync mode is active. You can then select a base note value for tempo syncing from the pop-up menu above the control.

Using Effects
To insert a new effect, click the + button that appears if you point the mouse at an empty plug-in slot or at one of the arrows before or after a used effect slot.
To remove an effect from an effect slot, click the effect name and select None from the pop-up menu.
To change the order of the effects in the chain, click on an effect and drag it to another position.
To activate or deactivate an effect, click the pedal-like button below the effect name. If an effect is active, the LED next to the button is lit.
Pre-effects and post-effects can be mono or stereo, depending on the track configuration.
Using quick controls you can set up an external MIDI device, such as a foot controller, to control the VST Amp Rack effects. For more information about quick controls, see the Operation Manual.
Amplifiers
The amps available on the Amplifiers page are modeled on real-life amplifiers. Each amp features settings typical for guitar recording, such as gain, equalizers, and master volume. The sound-related parameters Bass, Middle, Treble, and Presence have a significant impact on the overall character and sound of the corresponding amp.
- Plexi
Classic British rock tone; extremely transparent sound, very responsive.
- Plexi Lead
British rock tone of the 70s and 80s.
- Diamond
The cutting edge hard rock and metal sounds of the 90s.
- Blackface
Classic American clean tone.
- Tweed
Clean and crunchy tones; originally developed as a bass amp.
- Deluxe
American crunch sound coming from a rather small amp with a big tone.
- British Custom
Produces the sparkling clean or harmonically distorted rhythm sounds of the 60s.
The different amps keep their settings if you switch models. However, if you want to use the same settings after reloading the plug-in, you need to set up a preset.
Selecting and Deactivating Amplifiers
To switch amps on the Amplifiers page, click the model that you want to use. Select No Amplifier if you only want to use the cabinets and effects.
Cabinets
The cabinets available on the Cabinets page simulate real-life combo boxes or speakers. For each amp, a corresponding cabinet type is available, but you can also combine different amps and cabinets.
Selecting and Deactivating Cabinets
To switch cabinets on the Cabinets page, click the model that you want to use. Select No Cabinet if you only want to use the amps and effects.
If you select Link Amplifier & Cabinet Choice, the plug-in automatically selects the cabinet corresponding to the selected amp model.
Microphones
On the Microphones page, you can choose between different microphone positions. These positions result from two different angles (center and edge) and three different distances from the speaker, as well as an additional center position at an even greater distance from the speaker.
You can choose between two microphone types: a large-diaphragm condenser microphone and a dynamic microphone. You can crossfade between the characteristics of the two microphones.
To select one of the microphone types or blend between the two types, turn the Mix control between the two microphones.
Placing the Microphone
To select a microphone position, click the corresponding ball in the graphic. The selected position is marked in red.
Master
Use the Master page to fine-tune the sound.
Input/Output Level Meters
The input and output level meters on the left and the right of the Master section show the signal level of your audio. The rectangle on the input meter indicates the optimum incoming level range. In compact view, the input and output levels are indicated by two LEDs at the top left and right.
Using the Master Controls
To activate/deactivate the equalizer, click the pedal-like On/Off button. If the equalizer is active, the LED next to the button is lit.
To activate/deactivate an equalizer band, click the corresponding Gain knob. If a band is active, the LED to the left of the Gain knob is lit.
To tune your guitar strings, click the pedal-like On/Off button to activate the Tuner and play a string. If the correct pitch is displayed and the row of LEDs below the digital display is green, the string is tuned correctly.
If the pitch is too low, red LEDs are lit on the left. If the pitch is too high, red LEDs are lit on the right. The more LEDs are lit, the lower/higher is the pitch.
To mute the output signal of the plug-in, click the pedal-like Master button. If the output is muted, the LED is not lit. Use this to tune your guitar in silence, for example.
To change the volume of the output signal, use the Level control on the Master page.
Configuration
On the Configuration page, you can specify whether you want to use VST Amp Rack in stereo or in mono mode.
To process the pre-effects, the amplifier, and the cabinets in full stereo mode, make sure that the plug-in is inserted on a stereo track, and activate the Stereo button.
To use the effect in mono-mode, make sure that the plug-in is inserted on a mono track, and activate the Mono button.
In stereo mode, the effect requires more processing power.
View Settings
You can choose between 2 views: the default view and a compact view, which takes up less screen space.
In the default view, you can use the buttons at the top of the plug-in panel to open the corresponding page in the display section above the amp controls. You can horizontally resize the plug-in panel by clicking and dragging the edges or corners.
In the compact view, the display section is hidden from view. You can change the amp settings and switch amps or cabinets using the mouse wheel.
Using the Smart Controls
Smart controls become visible on the plug-in frame when you move the mouse pointer over on the plug-in panel.
Switching between Default and Compact View
To toggle between the different views, click the down/up arrow button (Show/Hide Extended Display) at the top center of the plug-in frame.

Changing the Amplifier and Cabinet Selection in the Compact View
In the compact view, a smart control on the lower border of the plug-in frame allows you to select different amplifier and cabinet models.
To select a different amplifier or cabinet, click the name and select a different model from the pop-up menu.
To lock the amplifier and cabinet combination, activate the Link/Unlink Amplifier & Cabinet Choice button. If you now select another amp model, the cabinet selection follows. However, if you select a different cabinet model, the lock is deactivated.

Previewing Effect Settings
In both views, you can show a preview of the pre- and post-effects that you selected on the corresponding pages:
Click and hold the Show Pre-Effects or Show Post-Effects button at the bottom left or right of the plug-in frame.
