Mixer
The Mixer allows you to control the sounds produced in playback, both for the master output and on each individual channel.

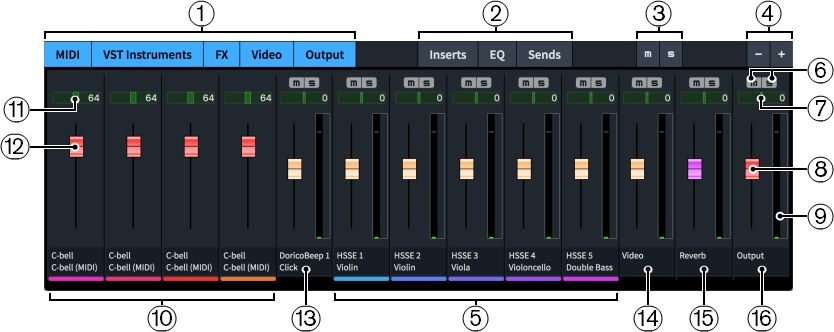
The Mixer comprises the following:
-
Channel type buttons
Allow you to hide/show channels in the Mixer according to their type, and in any combination.
-
Channel controls
Allow you to hide/show the corresponding controls in the channel strip according to their type, and in any combination.
-
Deactivate All Mute States/Deactivate All Solo States
Allows you to deactivate all mute/solo states by clicking the corresponding button.
-
Zoom
Allows you to make channels wider/narrower.
-
VST channels
There is a mixer channel for each stereo output from the VST instruments in your project, and all instruments in your project are shown, even if they are spread across multiple VST instrument instances. Channels are stereo by default.
-
Mute/Solo
Allows you to mute/solo individual tracks.
-
Balance panner
Allows you to position the sound of each individual track on the stereo spectrum for stereo playback.
-
Fader
Allows you to control the volume level of each individual track.
MIDI channels have a MIDI fader.
-
Channel meter
Indicates the output volume of each individual channel in real time.
-
MIDI channels
Every VST instrument in your project has its own MIDI channel in addition to its VST channel. These MIDI channels allow you to change the MIDI volume and MIDI pan of each instrument.
-
MIDI pan
Allows you to position the MIDI output of the channel on the stereo spectrum for stereo playback.
-
MIDI fader
Allows you to change the MIDI volume of the channel.
Some plug-ins require MIDI faders, and this is often useful if you are using a MIDI device for playback.
-
Click channel
Allows you to control the volume of the metronome click.
-
Video channel
Allows you to control the volume of video audio.
-
FX Send channel
Allows you to control the volume of send effects, such as reverb. By default, this channel has REVerence loaded automatically.
-
Output channel
Allows you to control the master output volume.
In order to control the volume levels in your project, we recommend that you first input dynamics and adjust the dynamic curve to suit your project before using the track faders.
Any changes you make in the Mixer are automatically saved and applied to the project.