Note Expression Event Editor
The note expression event editor offers various modes for editing and adding note expression events.
-
To open the note expression event editor, double-click a note in the event display.
NoteIf you select several notes in the Key Editor, and you double-click any of them, the note expression event editor opens for all these notes. In this case, any editing affects all the notes that are present at the time position where you perform the editing.
-
To close the editor, click in the event display.
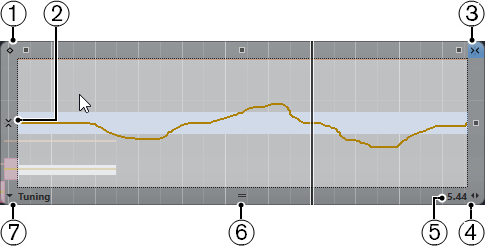
The note expression event editor features the following controls:
-
Note Expression controls
These controls allow you to select parameters and add note expression events.
-
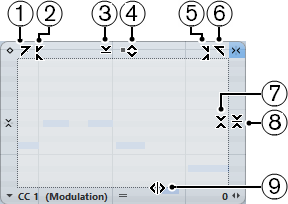
Smart controls
These allow you to edit the note expression events.
Note Expression Controls
The note expression event editor features the following specific note expression controls:

-
One-Shot Mode
If this is active and you click with the Draw tool anywhere in the editor, a fixed value is set.
NoteThis mode is automatically activated for note expressions that are one-shot only.
-
Vertical Snap
Allows you to enter the pitch in semitone steps instead of as a continuous curve. This way, it is much easier to create fast pitch modulations. This is especially useful for the Tuning parameter.
NoteTo temporarily switch to vertical snapping while editing, hold down Shift.
-
Horizontal Snap
This corresponds to the Snap button in the Project window.
-
Change Release Length
Allows you to add a release length to your note.
-
Parameter Range
Shows the current value at the cursor position. The value range differs depending on the parameter type.
-
Change Editor Size
Click this and drag up or down to change the size of the editor. This allows you to switch between 3 different window sizes.
-
Parameter Selection
Shows the selected parameter. Click this to open a pop-up menu with all the parameters that are used for the note. To make more parameters available, select them in the Inspector.
Smart Controls
The note expression event editor features the following smart controls for specific editing modes:

-
Tilt Left
If you click in the upper left corner of the editor, you can tilt the left part of the curve. This allows you to tilt the event values at the start of the curve upwards or downwards.
-
Compress Left
If you Alt-click in the upper left corner of the editor, you can compress or expand the left part of the curve. This allows you to compress or expand the event values at the start of the curve.
-
Scale Vertically
If you click in the middle of the upper border of the editor, you can scale the curve vertically. This allows you to raise or lower the event values of the curve in percent.
-
Move Vertically
If you click on the upper border of the editor, you can move the entire curve vertically. This allows you to raise or lower the values of the event values of the curve.
-
Compress Right
If you Alt-click in the upper right corner of the editor, you can compress or expand the right part of the curve. This allows you to compress or expand the event values at the end of the curve.
-
Tilt Right
If you click in the upper right corner of the editor, you can tilt the right part of the curve. This allows you to tilt the event values at the end of the curve upwards or downwards.
-
Scale Around Relative Center
If you Alt-click in the middle right border of the editor, you can scale the curve relative to its center. This allows you to raise or lower the event values horizontally around the center of the editor.
-
Scale Around Absolute Center
If you click in the middle right corner of the editor, you can scale the curve absolute to its center. This allows you to raise or lower the event values horizontally around the center of the editor.
-
Stretch
If you click on the lower border of the editor, you can stretch the curve horizontally. This allows you to move the event values of the curve to the left or to the right.