Drum Map Setup Dialog
The Drum Map Setup dialog allows you to load, create, modify, and save drum maps.
-
To open the Drum Map Setup dialog, select .
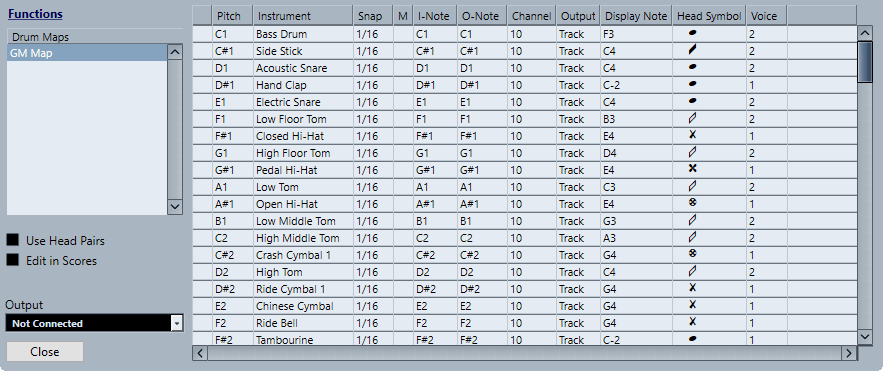
The Drum Maps list on the left shows the loaded drum maps. The sounds and settings of the selected drum map are displayed on the right.
The Functions pop-up menu contains the following options:
- New Map
-
Adds a new drum map to the project. To rename the drum map, click the name in the list and enter a new name.
- New Copy
-
Creates a copy of the selected drum map. You can then change the drum sound settings of the copy and rename the drum map in the list.
- Remove
-
Removes the selected drum map from the project.
- Load
-
Allows you to load existing drum maps into your project.
- Save
-
Allows you to save the drum map that is selected in the list. Drum map files have the extension .drm.
- Edit head pairs
-
Allows you to customize the note pairs.
The following options are available to the left:
- Use Head Pairs
-
If this option is activated, 2 head symbols for each drum sound are displayed in the drum sound list.
- Edit in Scores
-
If this option is activated, you can change the settings for the score drum map directly in the score.
- Output
-
Allows you to select the output for the drum map sounds.
The following columns are available in the drum sound list to the right:
- Pitch
-
This corresponds to the I-note of the sound in the drum map and cannot be edited here.
- Instrument
-
The name of the drum sound in the map.
- Snap
-
This is used when entering and editing notes.
- Mute
-
Allows you to mute drum sounds.
- I-Note
-
The input note for the drum sound. When you play this note, it is mapped to the corresponding drum sound and automatically transposed according to the Pitch setting for the sound.
- O-Note
-
The MIDI output note that is sent out every time the drum sound is played back.
- Channel
-
The MIDI channel, on which the drum sound is played back.
- Output
-
The MIDI output on which the drum sound is played back.
- Display Note
-
The displayed pitch, that is, the pitch at which the note is shown in the score. For example, you typically want all three hi-hat sounds to be shown on the same system line in the score, but with different symbols. Therefore, you set these to the same display pitch.
- Head Symbol
-
Clicking in this column opens a pop-up menu in which you can select a notehead symbol for the sound. If Use Head Pairs is activated in the dialog, you can select a notehead pair instead.
- Voice
-
This allows you to make all notes with this pitch belong to a certain voice, so that their rests and stem directions are handled in the same ways, for example.