Recording Dialog
In this dialog, you can make recording settings and start recording an audio file.
-
To open the Recording dialog, open the Audio Editor or the Audio Montage window, and on the transport bar, click Record.
Main Buttons

- Record
-
Starts recording. Depending on the recording options, Pause mode is activated.
- Split Now
-
Opens the audio already recorded in a new window while recording continues. By clicking this button, you can decide when the file is split. The button is activated if you are recording a named file, you are not pausing, and Auto-Split is not activated.
- Pause
-
Pauses recording.
- Stop
-
Stops recording.
- Discard
-
Stops recording and deletes anything recorded so far.
Method Tab
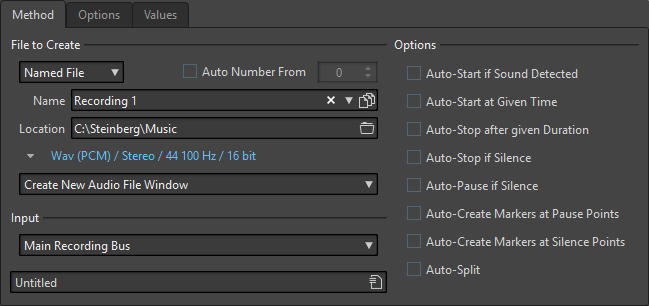
On this tab, you can define options for starting, stopping, and pausing the recording automatically. You can select an input device and choose to start a recording at a specific time or stop if after a specific duration.

- File to Create
-
Specify whether you want to record a temporary file to be saved later, or record to a file with a specific name and location.
- Auto Number From
-
If this option is activated and you record multiple files, increasing numbers are added to the file names of the files.
- Name
-
The name of the file to be written, without the path. When typing, all files in the selected folder that start with the same letters are displayed. To display all files in the selected folder, click the list icon.
- Location
-
Specifies the folder where you want to save the recording.
- Audio File Format
-
Opens the Audio File Format dialog, where you can specify the file format.
- Location of the Recording
-
Allows you to specify where the audio is recorded:
-
If Create New Audio File Window is selected, the audio is recorded in a new audio file window.
-
If Add to Active Audio File is selected, the audio is recorded in the active audio file window at the edit cursor position (if no audio file window exists, a new one is created).
-
If Add to Selected Track of Montage is selected, the audio is recorded in an existing audio montage at the edit cursor position (if no audio montage exists, a new one is created).
-
- Input
-
Allows you to select the input buses for recording.
- Auto-Start if Sound Detected
-
If this option is activated, recording starts when the audio input level exceeds the threshold level specified on the Values tab.
- Auto-Start at given Time
-
If this option is activated, recording starts at a specified time. Specify the time on the Values tab.
- Auto-Stop after given Duration
-
If this option is activated, recording stops automatically after the duration specified on the Values tab.
- Auto-Stop if Silence
-
If this option is activated, recording automatically stops when the audio input level drops below a specified threshold level and stays there for a specific amount of time. Specify the level and the duration on the Values tab.
- Auto-Pause if Silence
-
If this option is activated, recording automatically pauses when the audio input level drops below a specified threshold level and stays there for a specific amount of time. Specify the level and the duration on the Values tab.
- Auto-Create Markers at Pause Point
-
If this option is activated, a generic marker is created each time you click Pause during recording.
- Auto-Create Markers at Silence Points
-
If this option is activated, a generic marker is created each time the audio input level drops below a specified threshold level and stays there for a specific amount of time. Specify the level and the duration on the Values tab.
- Auto-Split
-
If this option is activated, the recording is automatically split into several audio files either after a specific amount of time or at a specific file size. Auto-Split is useful if you make long continuous audio recordings, such as live recordings.
The Auto-Split option is only available when Named File is selected. Selecting Auto-Split automatically activates the Auto Number option for audio file names. Split files are contiguous, that is, there are no gaps between the files.
-
To set the file size after which you want the recording to create a new file, select the Values tab and specify the File Size in the Auto-Split Parameters section.
-
To set the duration after which you want the recording to create a new file, select the Values tab and specify the File Duration in the Auto-Split Parameters section.
NoteIt is recommended to save each Auto-Split recording in an empty folder. This prevents the Auto Number option from creating files with names that already exist in this location.
-
Options Tab
On this tab, you can make additional settings for the recording process.

- Activate Monitoring When Opening Record Window
-
If this option is activated, monitoring is active when the Recording dialog opens. If this option is deactivated, the meters and the audio thru are displayed when pressing Record or activating Monitor.
- Deactivate Monitoring When Ending Recording
-
If this option is activated, audio thru is deactivated when recording ends. This releases the audio device input.
- Show Discard Button
-
Determines whether the Discard button is visible or hidden.
- Confirm when Discarding Recording
-
If this option is activated, you are asked to confirm before discarding a recording.
- Confirm when Stopping Recording
-
If this option is activated, you are asked to confirm before stopping a recording.
- Confirm Name of Markers to Drop
-
If this option is activated, you are asked to enter a name for the last dropped marker.
- Open Audio File in WaveLab Pro after Recording
-
If this option is activated, the audio files are opened in WaveLab Pro after recording.
- Add Markers when Inserting Recording in Audio File
-
If this option is activated and a recording is inserted into an audio file, markers are added encompassing the new samples.
- After Recording, Move Edit Cursor at the End
-
If this option is activated, the edit cursor is moved to the end of the recording.
Values Tab
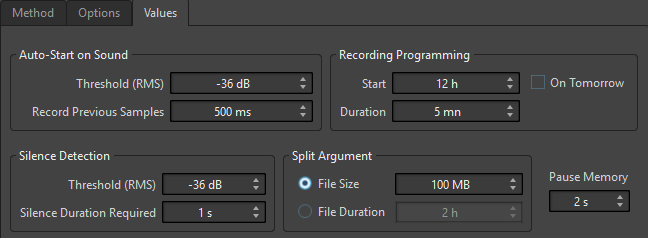
On this tab, you can define values for the various recording options.

- Auto-Start on Sound – Threshold (RMS)
-
Allows you to specify the sound level that triggers recording.
- Auto-Start on Sound – Record Previous Samples
-
Allows you to include a short section of audio before the start point, to capture attacks, for example. It is only relevant if Auto-Start if Sound Detected is activated.
- Silence Detection – Threshold (RMS)/Silence Duration Required
-
The threshold value used for the options Auto-Stop if Silence and Auto-Create Markers at Silence Points. It is used in conjunction with the Silence Duration Required setting, so that recording is stopped or a marker is added if the input level stays below the threshold value for the specified duration.
- Recording Programming – Start
-
Determines the time at which recording starts if Auto-Start at Specific Time is activated.
- Recording Programming – On Tomorrow
-
If this option is activated, you can specify a time on the next day (starting midnight).
- Recording Programming – Duration
-
Determines the length of the recording if Auto-Stop after Specific Duration is activated.
- Auto-Split Parameters
-
If File Size is activated, a new file is created when the recorded file reaches the size specified in the corresponding value field. This option is only active if Auto-Split is activated on the Method tab.
If File Duration is activated, a new file is created when the recorded file reaches the length specified in the corresponding value field. This option is only active if Auto-Split is activated on the Method tab.
- Pause Memory
-
This is a safety buffer when you are using the Pause button. When you resume recording, this buffer is used to restore the last short section of audio before you deactivated the Pause button. This way, you can resume recording even if you deactivated the Pause button a bit too late.
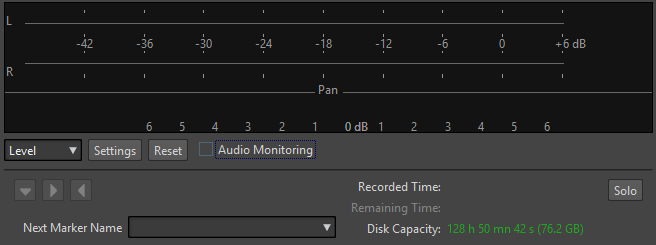
Meter Display

- Level/Spectrum
-
Specifies which meter to display.
- Settings
-
If the Level display is selected, the Level/Pan Meter Settings dialog opens, where you can customize the meter settings.
If the Spectrum display is selected, a pop-up menu opens, where you can select the audio levels that the meter should display. The following settings are available for the Spectrum display:
-
Restrict to High Audio Levels
-
Include Medium Audio Levels
-
Include Low Audio Levels
-
- Reset
-
Resets the peak values.
- Audio Monitoring
-
If this option is activated, the audio input is also sent to the output ports.
- Marker
-
Allows you to set markers during the recording.
- Next Marker Name
-
Edit the name of the next marker to insert.
- Solo
-
Reduces/Increases the size of the window and hides/shows all other WaveLab Pro windows.