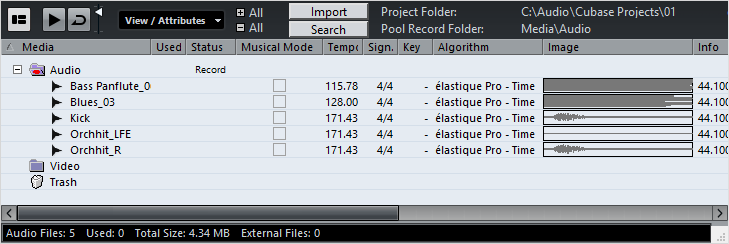
Pool Window
The Pool window allows you to manage the media files of the active project.
You can open the Pool in the following ways:
On the Project window toolbar, click Open Pool Window. If this icon is not visible, you must activate the Media & MixConsole Windows option on the toolbar context menu.
Select .
Select .

The content of the Pool is divided into the following folders:
- Audio Folder
Contains all audio clips and regions that are in the project.
If the projects contains one or more sampler tracks, a dedicated sampler track subfolder is created in the audio folder. This subfolder contains all clips of samples that you have loaded into Sampler Control.
- Video Folder
Contains all video clips that are in the project.
- Trash Folder
Contains unused clips that have been moved here for later permanent removal from the hard disk.
You cannot rename or delete these folders, but you can add any number of subfolders.
Toolbar

Show Info
Activates/Deactivates the info line.
Audition
If this option is activated and you select a clip in the Pool, it is played back.
Audition Loop
If this option is activated, the playback of the selected clip is looped.
Volume
Lets you specify the playback volume.
View/Attributes
Lets you activate/deactivate which attributes are displayed in the Pool window.
Open/Close all folders
Opens/Closes all folders.
Import
Lets you import media files to the Pool.
Search
Lets you search the Pool and connected disks for media files.
Project Folder
Displays the path to the folder of the active project.
Pool Record Folder
Displays the path to the record folder of the active project. By default, this is the Audio folder. However, you can create a new Audio subfolder and designate this as your Pool record folder.
Pool Window Columns
Various information about the clips and regions can be viewed in the Pool window columns. The columns contain the following information:
- Media
Contains the Audio, Video, and Trash folders. If the folders are opened, the clip or region names are shown and can be edited.
- Used
Displays how many times a clip is used in the project. If there is no entry in this column, the corresponding clip is not used.
- Status
Displays various icons that relate to the current Pool and clip status. The following symbols can be displayed:
Record folder

Indicates the current Pool record folder.
Process

Indicates that a clip has been processed.
Missing

Indicates that a clip is referenced in the project but missing from the Pool.
External

Indicates that the file the clip related to is external, for example, located outside the current Audio folder for the project.
Recorded

Indicates that the clip has been recorded in the open version of the project. This is useful for finding recently recorded clips quickly.
- Musical Mode
You can use the musical mode to tempo-match audio loops to the project tempo. The checkbox in this column allows you to activate or deactivate musical mode. If the Tempo column displays ???, you must enter the correct tempo before you can activate Musical Mode.
- Tempo
Displays the tempo of audio files if available. If no tempo has been specified, the column displays ???.
- Sign
Displays the time signature, for example, 4/4.
- Key
Displays the root key if one has been specified for the file.
- Algorithm
Displays the algorithm preset that is used if the audio file is processed.
To change the default preset, click the preset name and select another preset from the pop-up menu.
- Info
For audio clips, this column displays the sample rate, bit resolution, number of channels, and length.
For regions, it displays start and end times in frames.
For video clips, it displays the frame rate, resolution, number of frames, and length.
- Type
Displays the file format of the clip.
- Date
Displays the date when the audio file was last changed.
- Origin Time
Displays the original start position where a clip was recorded in the project. As this value can be used as a basis for the Insert into Project option in the Media or context menu, you can change it if the Origin Time value is independent (for example, not for regions).
You can change the value by editing the value in the column, or by selecting the corresponding clip in the Pool, moving the project cursor to the new position and selecting .
- Image
Displays waveform images of audio clips or regions.
- Path
Displays the path to the location of a clip on the hard disk.
- Reel Name
If you have imported an OMF file, it may include this attribute, which is then shown in this column. The Reel Name describes the reel or tape from which the media was originally captured.
Info Line
The info line displays additional information regarding the files in the pool.
To activate the info line, click Show Info at the left of the toolbar.

The info line shows the following information:
- Audio Files
The number of audio files in the Pool.
- Used
The number of audio files in use.
- Total Size
The total size of all audio files in the Pool.
- External Files
The number of files in the Pool that do not reside in the project folder (for example, video files).