Auto Split Dialog in the Audio Montage Window
In this dialog, you can set up auto split rules for audio montages.
-
To open the Auto Split dialog for an audio montage, open the Audio Montage window, select the Process tab, and click Auto Split.
The Auto Split dialog contains a series of pages, with different parameters and options depending on the selected auto split method.
Source
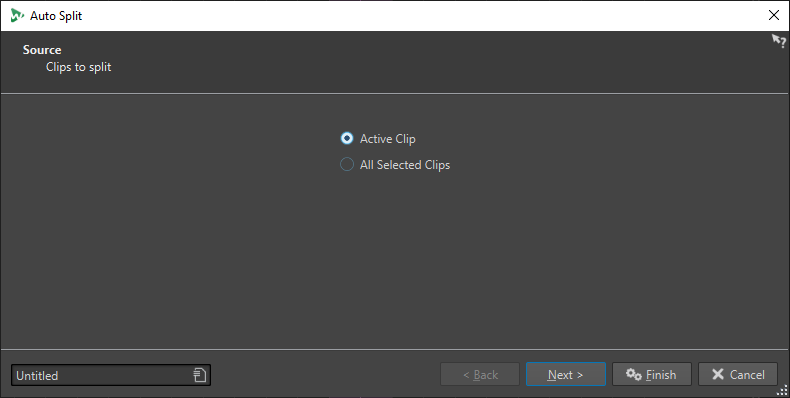
On this page, you select the clips that you want to split. The following options are available:
-
Active Clip
-
All Selected Clips
Method
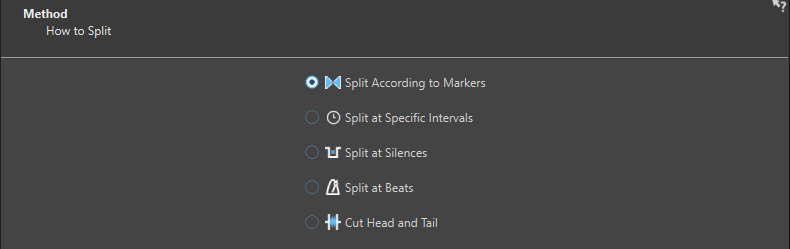
On this page, you select the type of splitting.
- Split According to Markers
-
Splits the files at specific marker positions. If you select this option, you can specify the marker type that will be used for the splitting on the next page.
- Split at Specific Intervals
-
Splits the files at specific time intervals. If you select this option, you can specify the time interval, that is, the duration of each region, on the next page.
- Split at Silences
-
Splits the files so that all non-silent sections become separate regions. If you select this option, you can specify the minimum region duration, the minimum duration of a silent section, and the signal level that should be considered as silence on the next page.
- Split at Beats
-
Detects beats in the audio material and splits the files at each beat. If you select this option, you can specify the sensitivity of the beat detection, the minimum beat level to create a split point, and the minimum region duration on the next page.
- Cut Head and Tail
-
Removes sections from the start and/or end of the files, silent section, or specified sections.
The options that you select on this page determine the available options on the next page of the Auto Split dialog.
Markers
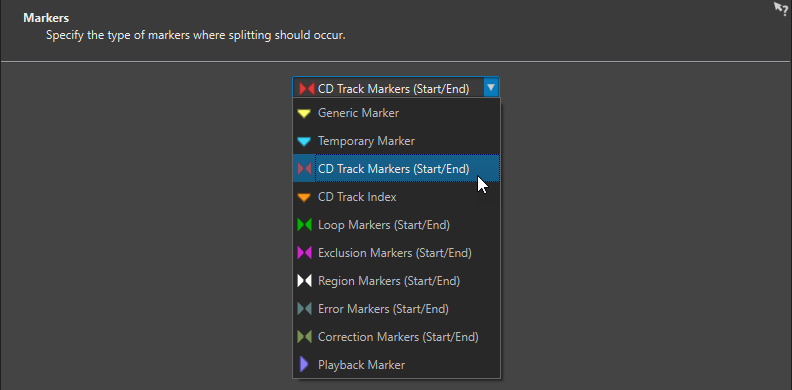
This page opens if you have selected Split According to Markers on the previous page.
Duration
- Marker Type
-
Allows you to select the marker type that should be used for splitting. For example, if you select Generic Marker, the files are split at the generic marker positions.
- Invert Regions
-
If this option is activated, your auto split settings are applied to the regions outside of start/end marker pairs.
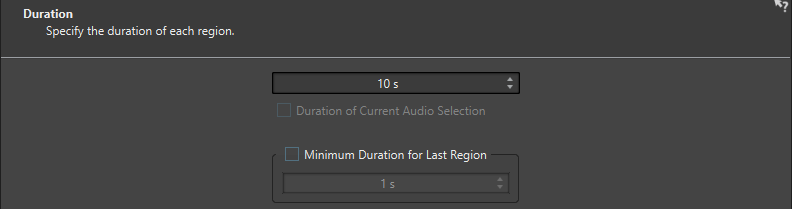
This page opens if you have selected Split at Specific Intervals on the previous page.
- Duration
-
Allows you to specify the duration of each region after splitting.
- Duration of Current Audio Selection
-
If you have made a selection in an audio file, you can set the duration of each region to be the same length as the selection after splitting.
- Minimum Duration for Last Region
-
If this option is activated, you can specify a minimum duration for the last region in the audio file. If the remaining time is shorter than the specified value, the last region is extended by the corresponding amount.
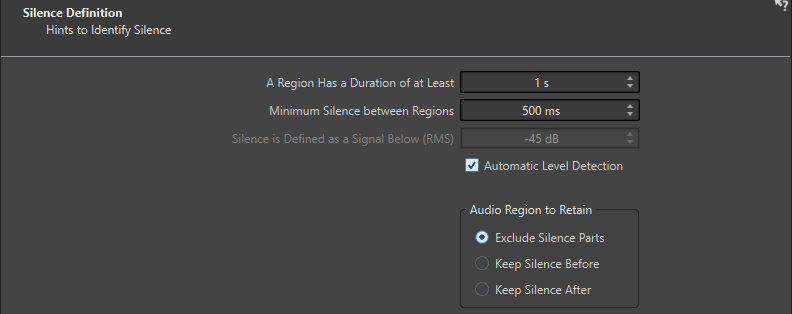
Silence Definition
This page opens if you have selected Split at Silences on the previous page.
- A Region Has a Duration of at Least
-
Allows you to set the minimum length of the resulting regions after splitting. Non-silent sections that are shorter than this length will not become split regions.
- Minimum Silence between Regions
-
Allows you to set the minimum length of a silent region. Silent regions shorter than this length are not taken into account when splitting.
- Silence is Defined as a Signal Below (RMS)
-
Allows you to set the threshold level for detecting silence. Levels below this value are considered as silence. The Automatic Level Detection option below allows you to detect silence automatically.
- Automatic Level Detection
-
If this option is activated, WaveLab Pro automatically detects silence and splits the file accordingly.
- Audio Region to Retain
-
Allows you to specify which silent part of your audio region you want to retain after splitting. The following options are available:
-
If Exclude Silence Parts is activated, silent parts of the audio range are excluded when the audio is split.
-
If Keep Silence Before is activated, the silent part of the audio range before the audio signal is included in the resulting audio range.
-
If Keep Silence After is activated, the silent part of the audio range after the audio signal is included in the resulting audio range.
-
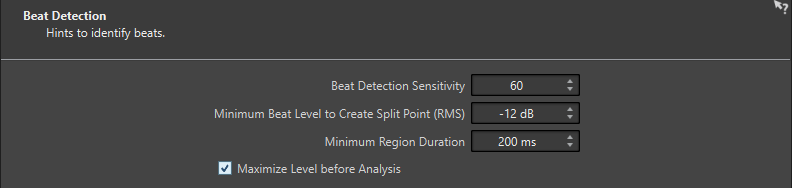
Beat Detection
This page opens if you have selected Split at Beats on the previous page.
- Beat Detection Sensitivity
-
Allows you to specify the sensitivity of the beat detection algorithm. Depending on the source material, you may need to try different sensitivity values.
- Minimum Beat Level to Create Split Point (RMS)
-
Allows you to specify the minimum beat level that is required to create a split point. Beats with a level equal or greater than this value will create a split point.
- Minimum Region Duration
-
Allows you to set the minimum length of the resulting regions after splitting. If you get many small regions when splitting, you could increase the minimum region length.
- Maximize Level before Analysis
-
If this option is activated, the audio level will be maximized for better beat detection. This non-destructive process does not modify the audio file levels.
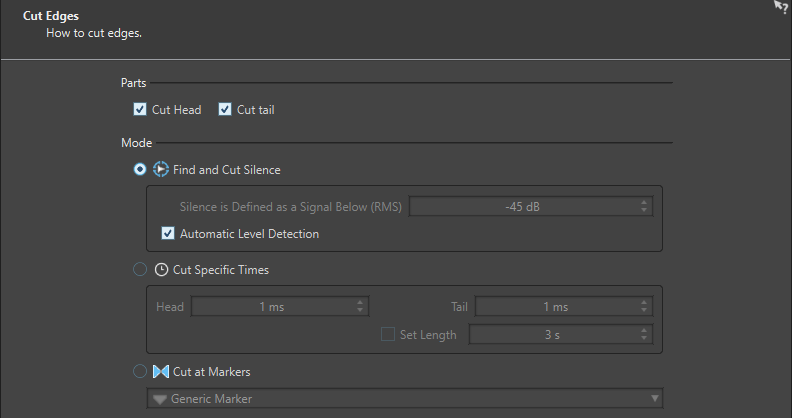
Cut Edges
This page opens if you have selected Cut Head and Tail on the previous page.
- Cut Head
-
If this option is activated, the audio at the start of the file is removed.
- Cut Tail
-
If this option is activated, the audio at the end of the file is removed.
- Find and Cut Silence
-
If this option is activated, silent sections are removed from the start and/or end of the file.
- Silence is Defined as a Signal Below (RMS)
-
Allows you to set the threshold level for detecting silence. Levels below this value are considered as silence. The Automatic Level Detection option below allows you to detect silence automatically.
- Automatic Level Detection
-
If this option is activated, WaveLab Pro automatically detects silence and splits the file accordingly. This process takes longer because the audio file is read twice.
- Cut Specific Times
-
If this option is activated, you can specify the duration of the Head and Tail of the audio file that you want to remove.
- Set Length
-
If this option is activated, you can specify the length that you want for your audio file.
- Cut at Markers
-
If this option is activated, you can remove sections around markers. The menu below allows you to select to which marker types you want to apply this option.
Destination
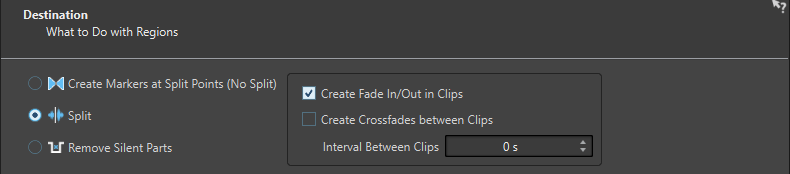
On the fourth page, you specify what to do with the regions that are created by auto split.
Depending on the selected option on the Method page of the Auto Split dialog, some options are grayed out if they are not applicable.
- Create Markers at Split Points (No Split)
-
If this option is activated, markers will be created at the split positions. This allows you to experiment with the auto split settings without creating files. Once you have found the best setting, you can switch to another destination option.
- Split
-
If this option is activated, each split region is added as a clip at the cursor position of the active track in the active audio montage. Make sure to select the correct track and cursor position before using this option.
- Remove Silent Parts
-
If this option is activated, the audio outside of split regions will be replaced with silence. For example, this allows you to remove ambience sound with absolute silence.
- Interval Between Clips
-
Allows you to define the time between the resulting clips.
- Create Fade In/Out in Clips
-
If this option is activated, a fade with the default duration is added to the start and end of each clip. You can edit the default fade duration and fade shape in the Audio tab of Global Preferences.
Naming
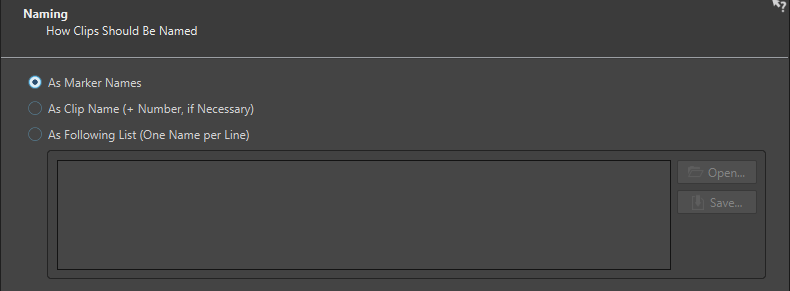
On this page, you specify how to name the clips that are created by auto split.
- As Marker Names
-
If this option is activated and you have selected Split According to Markers earlier in the dialog, the clips are named after the markers that determine the split position.
NoteYou must have specified marker names to be able to use this option.
- As Clip Name (+ Number, if Necessary)
-
If this option is activated, the resulting clips are named after the source clip with an incrementing index number added.
- As Following List (One Name per Line)
-
If this option is activated, the resulting clips are named according to the list of names specified below.
-
To save the list as a text file, select Save, enter a name and location, and select Save.
-
To open a saved naming scheme file, click Open, select the text file that you want to open, and click Open.
-
Finish
The Finish button is available from all pages. If you are sure about your settings, you can click Finish without having to go to all pages. For example, when you are using a preset and you know that you do not want to make changes on the last pages, you can click Finish earlier.