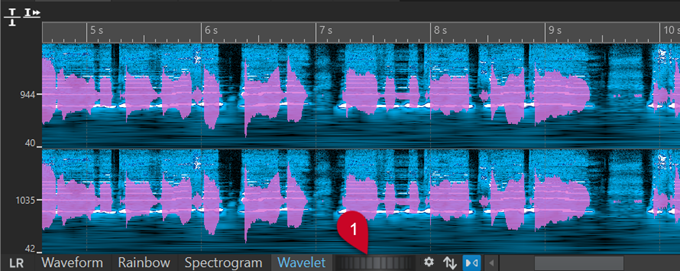
Wavelet Display
The Wavelet display shows a higher time resolution in high frequencies and a higher frequency resolution in lower frequencies.
-
To see the Wavelet display of an audio file in the Audio Editor, click Wavelet at the bottom of the Main View or the Overview.

Figure 1. Wavelet Display -
You can overlay the Wavelet view with the Waveform view via the scroll wheel (1). The farther you turn the scroll wheel to the right, the higher the opacity of the waveform overlay; that is, the more prominent it becomes. The farther you turn the scroll wheel to the left, the more transparent the waveform overlay. Turning the scroll wheel all the way to the left sets the transparency to 100%, so that the waveform overlay is not visible.

Figure 2. Waveform Overlay in the Wavelet View -
To switch between the Wavelet display for the left/right channels and the mid/side channels, click the LR/MS button at the bottom left of the Wavelet display.
Each vertical line represents the frequency spectrum at a particular time position.
-
You can make time selections and frequency selections in the Wavelet display.
If you make frequency selections in the Wavelet display, you can use the WaveLab Pro spectrum editing tools on the Spectrum tab to edit the wavelet. If you point the mouse cursor at a defined frequency selection, a tooltip displays the frequency range and the time range for the current selection.
You can also use the WaveLab Pro editing tools on the Edit tab to edit the wavelet.
-
Low frequencies are shown at the bottom of the display and high frequencies at the top.
-
In the Spectrogram Options dialog, you can specify how to display the frequency spectrum and the waveform overlay.
-
The vertical ruler on the left shows the frequency range in Hz.
-
The status bar shows the time/frequency position of the mouse cursor.
-
If you are in spectrum editing mode, you can right-click in the Wavelet display to open a context menu with additional options.
In the Wavelet display, you cannot zoom in and out as far as in the Spectrogram due to performance constraints.